01 · First session
Build, open, and get oriented
SignalForge is a native Linux desktop application. From the repository root, build it once and launch it:
python3 prototypes/phase01/bootstrap.py
./tools/build.sh
./tools/run-desktop.sh
The bootstrap downloads the pinned build toolchain and is only needed for the first setup. To look around without an audio device, launch with --offline. Offline preview shows the interface with simulated transport; it does not record or play through your audio hardware.
On launch, open an existing project or create one from the project chooser. Save the project before importing audio, so SignalForge has a project folder in which to keep its media. Plugin downloads work before the first save; saving copies their model files into the project.
Open rig / project · Save · Play · Stop · Record · Locate to the start · Undo · Redo
The status readout reports the current audio mode, sample rate, xruns and processing load. The project sidebar and four mode tabs stay connected to one session: changing views does not make a copy of your tracks.
02 · Projects
Save work and reuse a starting setup
- Open rig / project opens the project chooser. Pick a recent project, browse to another project, or start with a template.
- Save or the standard Save shortcut writes the current session. Unsaved edits are also autosaved; if SignalForge reports an interrupted session, use Repair → Recover to restore its recovery data.
- Template… in Tracks replaces the current session with a built-in or saved template after asking about unsaved work. To keep the current project separate, start a new project from a template in the project chooser. Save your own setup as a template from the template window.
- When a project reports missing media, choose Repair → Relink media… and point SignalForge to the moved file. Missing… lists the remaining dependencies.
Templates provide tracks, routing and processor placeholders. They do not include third-party plugins, device bindings or licensed models: choose the processors and connect the hardware you have installed.
03 · Workspace
One session, four views
The top row is the transport. The left Session panel selects tracks and other nodes, and has buttons to add inputs, tracks, buses, plugins, tuners and the built-in noise gate. The tabs open the four views:
Tracks arranges audio and MIDI clips on a timeline.
Mixer shows channel strips, levels and processing.
Routing connects the session to devices and other applications.
Live Rig manages the selected instrument track's playing chain.
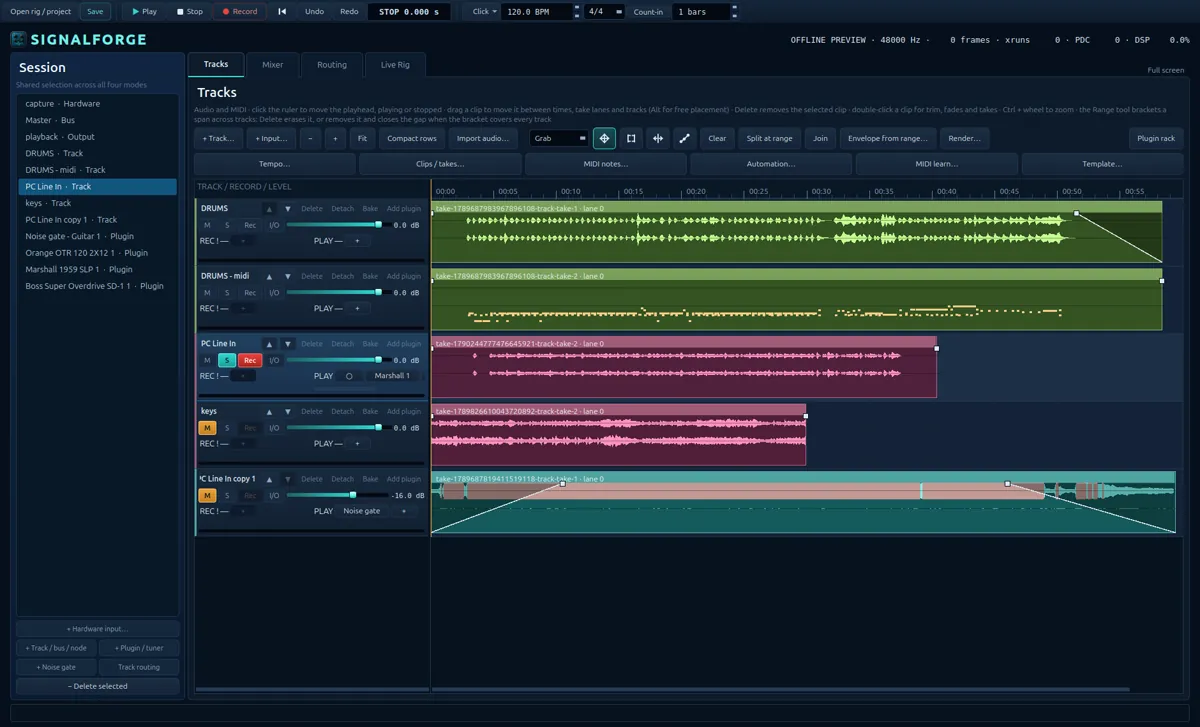
Use Full screen or F11 to give the current mode more room. Press F11 again to return to the full workspace. Compact rows in Tracks and compact strips in Mixer are separate view settings.
04 · Record and import
Capture audio or MIDI
Set up an audio input
- Choose + Hardware input… in the Session panel.
- Name the input, choose mono or stereo, and select the device's audio output port or ports. Choose Connect later in Routing if you want to patch it there.
- SignalForge creates the input, a monitored track and a recording tap together. Repeat to add another source.
- In Tracks, arm the track with Rec, set its level, and press the transport's Record button. Stop to finish the take.
A normal audio track can record when it has an input. If Rec is disabled, connect an input to it in Routing or add a hardware input. MIDI tracks carry notes to an instrument plugin and monitor its audio through Master; they do not record hardware audio.
Use the click and count-in
Click arms the metronome for playback and recording. Open its arrow for Audition (hear only the click while stopped), Accent (emphasise the downbeat) and click level. Set tempo and meter in the transport. Turn on Count-in and choose 1–8 bars before recording begins. The click is a monitor aid and is not added to the recording.
Import an audio file
Save the project, select an audio track, then choose Import audio… in Tracks. WAV, AIFF and FLAC files are supported. Imported audio must use the session's sample rate. The imported media remains separate from the source file.
05 · Tracks
Arrange audio, takes, and ranges
In Tracks, click a clip to select it. Ctrl+click adds or removes clips from the selection. Drag a clip to move it in time, onto another track, or between take lanes. Hold Alt while placing a clip to ignore the beat snap. Delete removes the selected clip; double-click a clip to open its editing controls.
G Grab · B Range · C Cut · E Envelope
- Grab
- Move and select clips. Drag the empty timeline to pan the view.
- Range
- Drag a time bracket across one or more tracks. Use it to split, remove a span, join compatible split clips, set a fade, edit an envelope, or render just that range.
- Cut
- Click an audio or MIDI clip to split it at that point. The two new faces get a short declick fade on audio.
- Envelope
- Edit audio clip gain points. Use this tool when you want to draw or move the gain line; switch back to Grab to move clips normally.
The timeline ruler is labelled in time. Click it to move the playhead; Ctrl+mouse-wheel zooms around the pointer. The − and + buttons zoom out and in, and Fit fits the recorded region into view. Musical placement snaps to the session beat grid unless Alt is held.
Tempo… opens the tempo map. Each row sets a frame, BPM and time signature; the first row starts at frame zero. Tempo changes guide new musical placements and snapping. Existing audio and notes stay at their frame positions, so changing tempo does not time-stretch them.
Work with a time range
With Range selected, drag across the desired span. Split at range cuts clips at the bracket edges. Join rejoins adjacent split clips when they are compatible. Delete removes the bracketed material; when the bracket covers every track, the time is removed and the gap closes. Clear removes the bracket without editing.
Trim, loop, and comp takes
Open Clips / takes… to choose a clip and an action. Properties / move / fades / take lane exposes the clip's timeline start, fade lengths in frames, fade shapes, gain, polarity, mute, take group, lane and active/inactive state. Trim to A..B keeps the selected frame span and leaves the source file untouched. Loop: A additional copies repeats the clip as more instances.
Recorded takes appear on separate lanes. To comp, choose the take containing the part you want and select Comp take range A..B. SignalForge uses that take for the bracketed section, marks the other takes in its group inactive for that span, and preserves the existing comp material on either side. An inactive take is still available to comp later.
Track headers include mute, solo, record arm, input/output, level and track actions. Use the up/down controls to reorder tracks. Detach makes a playback-only copy of a track's clips and processing while leaving the original input available for another take. Bake renders the track's sound to a new playback-only track while leaving the source unchanged.
To compact the view, turn on Compact rows. Track and take rows get shorter, while the same controls remain available.
06 · Clip editing
Fades, gain, and clip-level controls
Clip edits are non-destructive: they change the session's instructions for playing source media, not the original audio file. Stop playback before structural edits, plugin changes, project opening, undo or redo.
Fade and crossfade
Drag the square handles at the top corners of an audio clip to set fade-in and fade-out lengths. The curve drawn on the clip is the curve playback uses, and the length appears while dragging. Right-click a fade to choose Linear, Constant power, Symmetric, Slow or Fast, or turn it off. A switched-off fade plays at full level and keeps its length and shape.
Linear suits related or phase-aligned material; Constant power is a general choice for unrelated material; Symmetric makes a gradual S-shaped transition. Slow brings a fade-in up sooner; Fast keeps it low longer. Fades may overlap; where they meet, the lower curve determines the level.
Overlapping clips do not crossfade automatically. Open Clips / takes…, choose two overlapping clips on one track and apply Crossfade. The paired fades default to constant power; choose linear for related material. Drag either paired handle to shorten the overlap with both fades following. To make it longer, move the clips further over one another and apply Crossfade again.
The Clips / takes… dialog also exposes exact fade lengths in frames, shape choices and on/off controls. The clip menu keeps the same properties reachable without dragging a handle.
New recordings, imports and cut edges receive a short fade to soften abrupt cuts. To set a fade from a bracket, choose Set fade in from range or Set fade out from range from the clip menu. The bracket must touch the corresponding clip edge.
Region gain, polarity, and mute
Right-click a selected clip for clip commands, or open Clips / takes… to edit its values directly. Boost and Cut change region gain by 1 dB; Reset returns it to 0 dB. Invert polarity reverses the signal's sign. Mute silences the clip without removing it. These commands can act on a multi-clip selection.
Normalise… adjusts region gain so a clip's source peak reaches the target (−1 dBFS by default). Choose each clip's own peak or one shared adjustment for the selection. The scan ignores fades and the gain envelope. Normalising changes clip metadata, not the media file.
The waveform preview reflects region gain and marks peaks that would exceed 0 dBFS. A badge shows non-zero gain and inverted polarity. Muted clips are shaded and labelled; this is different from a take that is inactive in a comp.
Draw a gain envelope
Choose the Envelope tool. Click inside an audio clip to add a point; drag a point to change its time or level. Points stay in order. Time snaps to the beat grid and levels near unity snap to 0 dB; hold Alt to bypass snapping. Double-click a point or select it and press Delete to remove it. The line interpolates in gain between points; an empty envelope leaves the level unchanged.
Right-click a clip for Envelope active to keep the line but bypass it, or Reset envelope to clear the points. With a bracket over the clip, choose Envelope from range… to raise or lower that span; it adds short ramps at bracket edges inside the clip. The envelope stays attached to the source audio when trimming, and split, loop and paste carry it with the clip.
Duplicate, copy, cut, paste, and nudge
These commands appear in the clip menu and work as shortcuts while the timeline has focus. Copy and paste operate on clips, so text fields keep their normal text-edit shortcuts.
| Command | Shortcut | What it does |
|---|---|---|
| Duplicate | Ctrl+D | Place a copy immediately after each selected clip. |
| Copy / Cut | Ctrl+C / Ctrl+X | Copy the selection, or copy and remove it in one undoable edit. |
| Paste at playhead | Ctrl+V | Paste onto the selected track, keeping the copied clips' spacing. |
| Nudge earlier / later | Alt+← / Alt+→ | Move the selection one quarter-note step at the initial tempo (10 ms when there is no tempo), keeping clips aligned. |
To paste onto an empty track, select its track in the Session panel, click the ruler to set the playhead and press Ctrl+V with the timeline focused. A paste keeps fades, gain, polarity, mute, notes and envelope, and assigns new clip identities. The clip clipboard is cleared when you open or create a project or apply a template.
Nudge moves the whole selection by a common amount. If any clip would move before the start or beyond the frame limit, the move is refused and SignalForge identifies the clip.
07 · MIDI and automation
Edit notes and control changes
MIDI clips and notes
Create a MIDI track with + Track… → MIDI track and connect it to an instrument plugin. MIDI notes… opens a note-list editor, not a piano-roll canvas. Each row lets you edit a note's start within the clip, duration, pitch, velocity and MIDI channel. Start is measured in quarter-note beats from the clip start: for example, 0.25 is a sixteenth note. The timeline shows note onsets in the clip.
Recorded MIDI messages are retained alongside the editable notes. MIDI clips can be split, moved, looped, duplicated and pasted like other clips. Audio clip gain, fades, polarity and mute do not change MIDI note playback.
Track automation
Choose Automation… to select a track or other graph node and a control, such as gain, pan or a hosted plugin parameter. Automation points are entered as frame/value rows and use step changes.
- Read
- Play the saved automation lane.
- Write
- Record the current control value through playback.
- Touch
- Write while you move or hold the control, then return to the saved lane when you release it.
- Latch
- Write while touched and keep the last value until playback stops.
Mixer faders and pan controls can write automation. For hosted plugin parameters, use the host controls or MIDI learn; changes made directly inside a plugin's own editor are not recorded as automation.
Map a MIDI controller
Open MIDI learn…, choose a control, its range and absolute, momentary or toggle behavior, then move a note, controller or program change on the connected MIDI input. Absolute CC assignments can use soft takeover to avoid a sudden jump when the controller and software values differ. Bindings apply to that input and are saved with the session; duplicate assignments are reported. Use the same window to remove a binding. A note release ends a momentary touch; for a continuous controller, use Release touch when you want to end it.
08 · Mixer
Balance tracks and shape channels
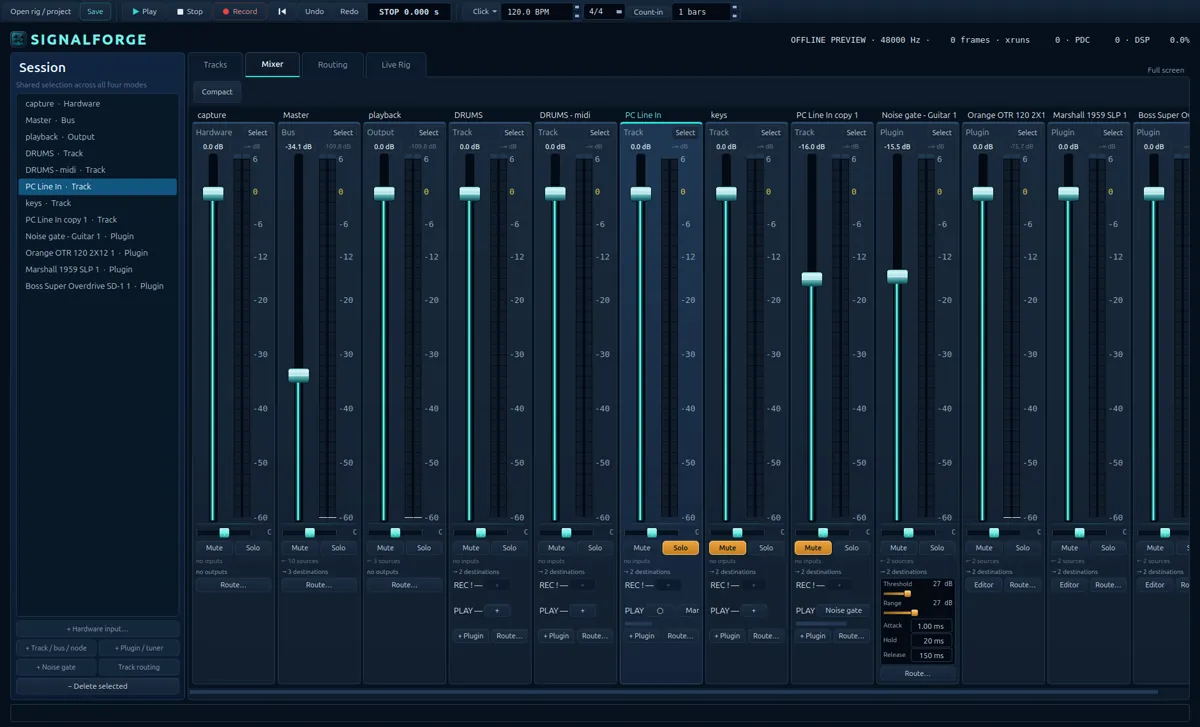
Each channel strip has a level fader, peak meter, pan control, Mute, Solo and Route…. Click a meter to clear its held peak. A selected strip is also selected in the Session panel and other modes.
Tracks, buses, outputs, hardware inputs and hosted plugins appear as nodes. Add a bus from the Session panel, then connect tracks to it using Route… or the Routing view. Use sends to feed shared effects or buses without replacing the main output route.
The built-in noise gate exposes its threshold, range, attack, hold and release controls on its strip. For other processors, open the hosted plugin editor. Compact strips fit more channels across the screen; scroll horizontally to reach the rest.
09 · Plugins
Add plugins to a track
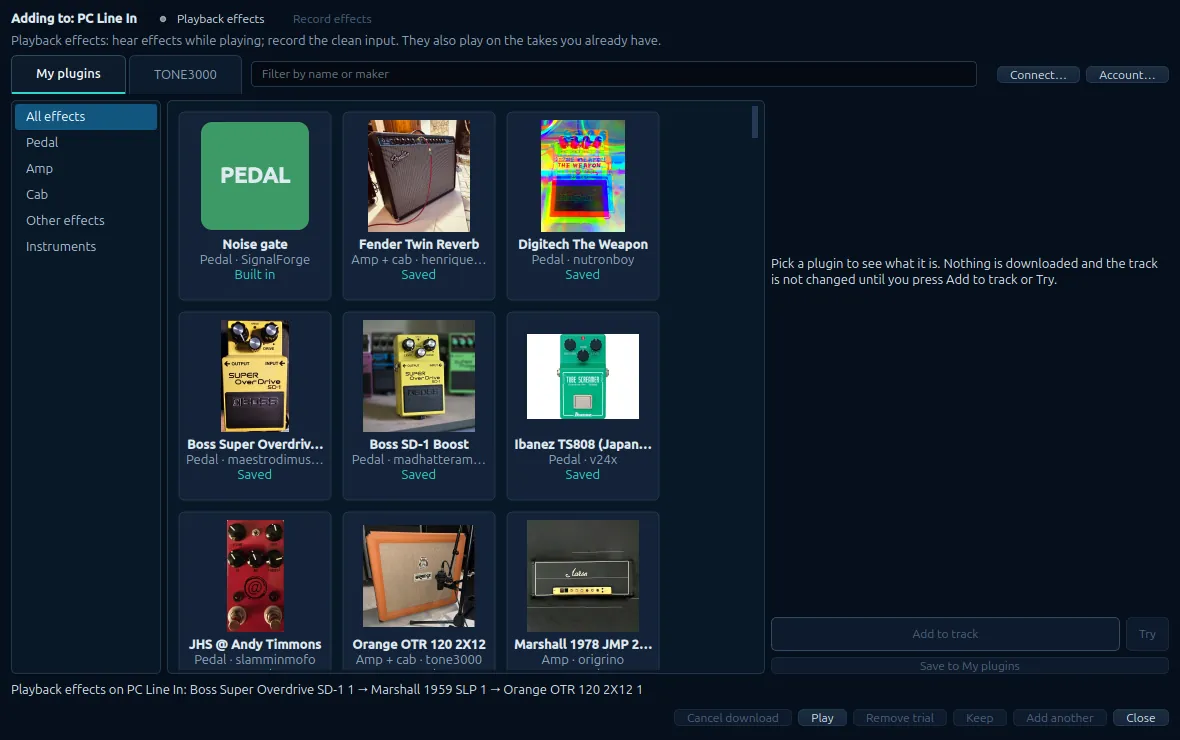
- Stop the transport. Click Add plugin in a track header, + Plugin on its mixer strip, or + at the end of one of its effect rows.
- Leave Playback effects selected to hear the effect while you play and on playback while the recording stays clean. Choose Record effects only when you want the processed sound recorded.
- Pick Pedal, Amp, Cab or Other effects, then look in My plugins (built-in effects, installed LV2, VST3 and CLAP effects, and what you have kept) or TONE3000 (sign in with your own account).
- Click Add to track, or double-click the card. The window stays open for the next one, which goes after it.
Try is optional. It puts a plugin on the track on trial, with the transport still stopped, so you can play your instrument through it. Try this instead swaps it for another in the same place. Keep makes it part of the track; Remove trial, Close or Escape drop only the plugin on trial. If the track has no input, Choose an input… opens Routing on the track. Save to My plugins keeps a TONE3000 download for later without adding it anywhere.
Each track shows its effects in a REC row and a PLAY row, in the order the signal passes through them. Click an icon for that plugin's settings: its own editor, or a slider per parameter. Drag an icon along its row to change the order. Right-click it for Move earlier, Move later, Bypass and Remove from track. Bypass and settings work during playback; adding, moving and removing need the transport stopped. Each change is one undo step, and removing a plugin leaves it in My plugins.
10 · Routing
Connect ports in the graph
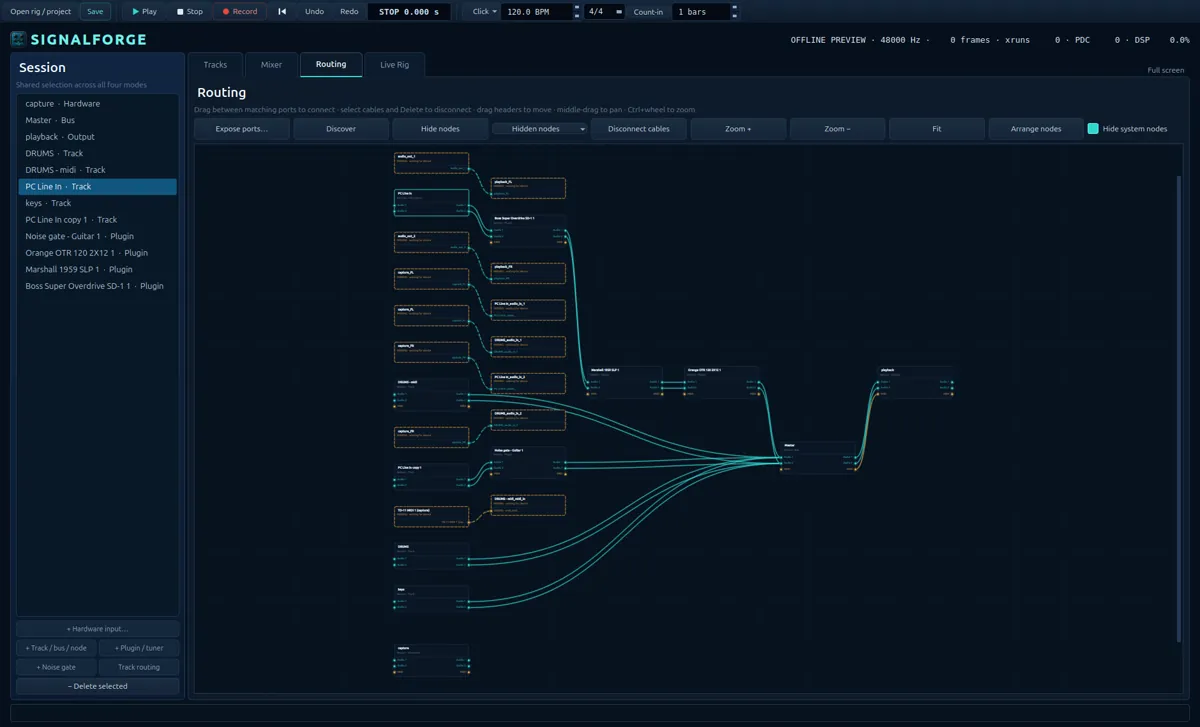
- Open Routing. If a device or application has just appeared, choose Discover.
- Drag from an output socket or its label to a compatible input. You can start at either end. Audio sockets are green and MIDI sockets are amber; incompatible ports are dimmed.
- Click a cable to select it. Ctrl+click or drag a selection box to select more than one, then press Delete or choose Disconnect cables.
Drag a node header to reposition it. Use the middle mouse button or scrollbars to pan; Ctrl+wheel or the zoom buttons change scale. Fit frames the graph. Arrange nodes lays it out again. Node positions and hidden-node choices are remembered for the project.
Select nodes and choose Hide nodes to declutter the view without disconnecting them. Restore individual nodes from Hidden nodes, or choose Unhide all. Hide system nodes hides desktop services that are not part of your music setup.
In the input dialog choose the device's output ports, or leave them for later. In Routing, connect those device outputs to the SignalForge input sockets. Then connect the SignalForge track or Master output to the playback device inputs.
11 · Live Rig
Build a playing chain
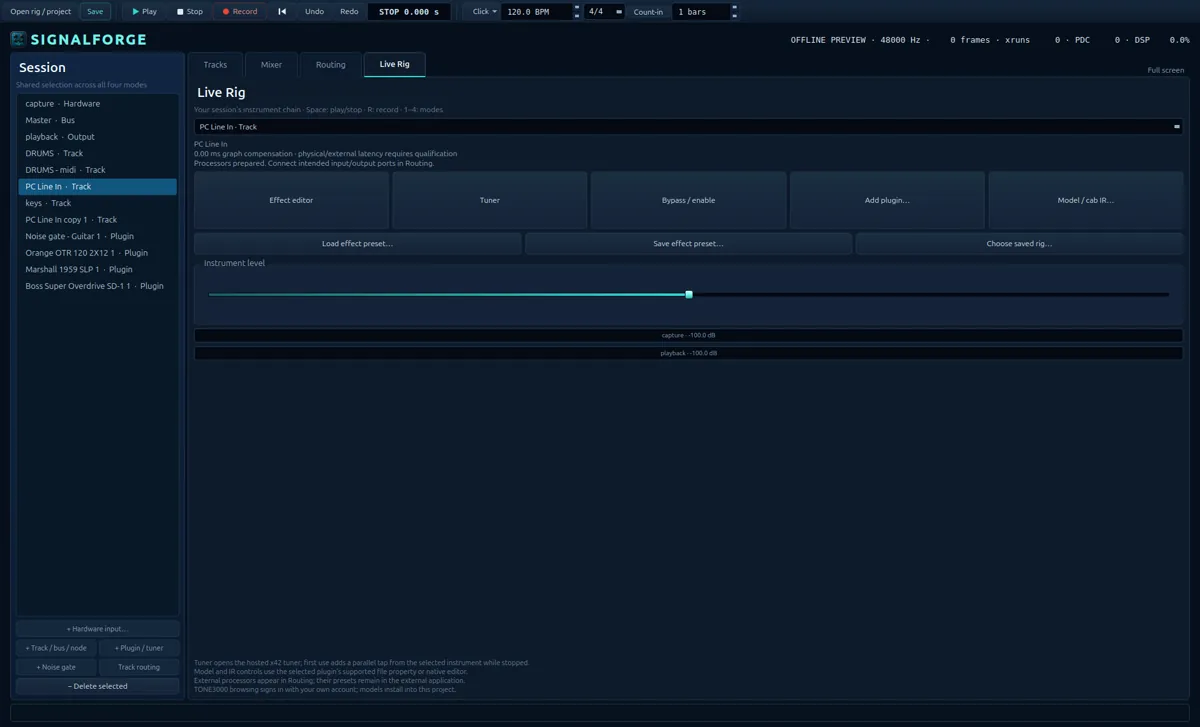
- Select an instrument track in the Session panel and open Live Rig.
- Choose Add plugin… to add amps, cabs and effects to the selected track from My plugins or TONE3000, as described in Add plugins to a track.
- Change the order of the track's effects by dragging their icons in Tracks or Mixer. Live Rig uses the same chain.
- Use Effect editor for the selected processor, Bypass / enable to toggle it, and Instrument level for the track's output level.
Sign in to TONE3000 with your own account; SignalForge does not include or redistribute TONE3000 models. Model / cab IR… remains available for directly choosing a supported plugin's file property. Tuner opens the hosted x42 tuner. The first use adds a parallel tuner tap while the transport is stopped.
Use Load effect preset… and Save effect preset… for SignalForge-hosted effect state. A third-party processor may keep its own preset format in its own application. For a supported plugin format (CLAP, VST3 or LV2), install the plugin on your system before adding it through + Plugin / tuner.
Adding, removing and reordering plugins require the transport to be stopped; bypass and plugin settings work during playback. If a template shows a missing processor, install the named plugin or replace the placeholder with one you have.
12 · Bake and export
Print a track or render files
Bake one track
In Tracks, click Bake in a track header. SignalForge renders that track through its processing and fader, includes the chain's tail, then creates a new playback-only track routed to Master. The source track is left unchanged. Use this to print a sound or keep a rendered copy alongside the editable source.
Render a mix or stems
Choose Render… in Tracks. Select the whole session or, if a bracket is set, that range. Choose a mix or stems, select a format and name, and set a tail length if needed. A tail value of zero lets the chains report their own tails.
- Mix renders the session as heard through its tracks, inserts, faders, pans, sends and buses. Mute and solo affect the result.
- Stems renders one file per track after its inserts and fader, before sends and buses. Stems line up with the session; track mute and solo do not remove them.
- Record in real time captures the live mix through the audio graph. Use this when the signal path needs external hardware, another application or a plugin that cannot render offline. It takes as long as playback and writes one mix file.
Rendering does not change the session. For a real-time render, playback must run to the end of the chosen range; Stop ends the capture.
13 · Quick reference
Keyboard shortcuts
| Shortcut | Action | Where it works |
|---|---|---|
| Space | Play or stop | Window, except while typing in a text or number field |
| R | Start recording | Window, except while typing in a text or number field |
| 1–4 | Switch to Tracks, Mixer, Routing or Live Rig | Window, except while typing in a text or number field |
| F11 | Toggle full screen | Window |
| Ctrl+S | Save | Window |
| Ctrl+Z / Ctrl+Shift+Z | Undo / redo | Window; standard platform shortcuts |
| G / B / C / E | Grab / Range / Cut / Envelope | Tracks |
| S | Split clips at the bracket edges | Tracks, with a range set |
| Ctrl+mouse wheel | Zoom the timeline | Tracks |
| Ctrl+D / Ctrl+C / Ctrl+X / Ctrl+V | Duplicate, copy, cut, paste clips | Tracks timeline focused |
| Alt+← / Alt+→ | Nudge selected clips | Tracks |
| Alt+↑ / Alt+↓ | Boost / cut region gain by 1 dB | Selected audio clips |
| Alt+0 / Alt+N / Alt+I / Alt+M / Alt+E | Reset gain / normalise / invert polarity / mute / toggle envelope active | Selected audio clips |
| Alt while dragging | Bypass timeline beat snapping | Tracks |
The clip shortcuts also appear in the clip context menu. Ctrl+C, Ctrl+X and Ctrl+V are scoped to the timeline, so they do not replace the clipboard behavior of text fields.
14 · Help
Common problems
I can see the meters, but hear no sound.
Check that the session is not in Offline Preview, that the transport is playing, and that the selected track and Master are connected to the intended playback device in Routing. Check track and Master mute/solo and the channel levels. A missing PipeWire device may need to be discovered again.
The Rec button is disabled.
The track has no recording input. Add a hardware input, connect its port to the track in Routing, or select a track with a recording tap. Playback-only tracks such as detached and baked tracks cannot record.
Imported audio is rejected.
Save the project first, select an audio track, and check that the audio file's sample rate matches the session's rate. Supported import formats are WAV, AIFF and FLAC.
A project or plugin reports missing files.
Open the Repair menu in the transport row. Use Relink media to locate moved audio; use Missing to review unresolved files or processors. Plugins must be installed on this system, and model or IR files must be available at their recorded paths.
A command is unavailable while playing.
Stop the transport first. Project changes, routing, plugin changes, undo/redo and many structural edits require a stopped transport so SignalForge can update the session safely.
The MIDI editor is a note list rather than a piano roll. Automation uses step changes. Clip edits do not time-stretch audio. Hardware latency and low-buffer reliability depend on the audio device and system, and have not been qualified for every setup.